I can’t believe I am typing these words. The staircase is done. Done!
The stairs have been a major obstacle since day one. We made very few changes to the original floor plan of the house, but the section that did involve most changes revolved around the stairs.

It was also one of the most difficult (or impossible) jobs to find someone to finish. You can read our previous post for more background on the staircase, but here are a couple pictures to remind you of what we removed.


The main part of the downstairs renovation could not occur until that staircase was removed and the new one was built in a different place. We were so lucky and thankful that a friend of ours agreed to do the initial framing for the stairs.

And then it stayed pretty much like this for the next five years (except I did add a temporary hand railing).

Of course, as you read this blog and look at the pictures you will probably think, “What’s the big deal?” But what is difficult to write about (without really boring you) is all the decisions that had to be made to get this done and the collection of skills that this required. It was a lot more than just adding risers and treads.
In many ways, the staircase became a final exam for me. Like a capstone project. It involved so many skills that we have acquired during the past 5 years. To be clear… I am an amateur. I don’t pretend to be very good at any of these skills. I’m just good enough to get by. One of the most common statements we get is “I didn’t know you guys were so handy.” To which we always reply, “We weren’t, we just learned as we went.” It took a lot of research, YouTube, blogs, and a whole lot of trial and error.
[Edit from Amy: I think people shouldn’t say “I didn’t know you WERE so handy”, although we are now, but more to the point, we are tenacious. Correction: ” I didn’t know you guys were so tenacious.” Alternatively, insert stubborn, bull-headed or the like. I mean, if the shoe fits, right? In hindsight it does seem a little crazy that we bought the house with only a small bathroom renovation under our belts. Insert crazy.]
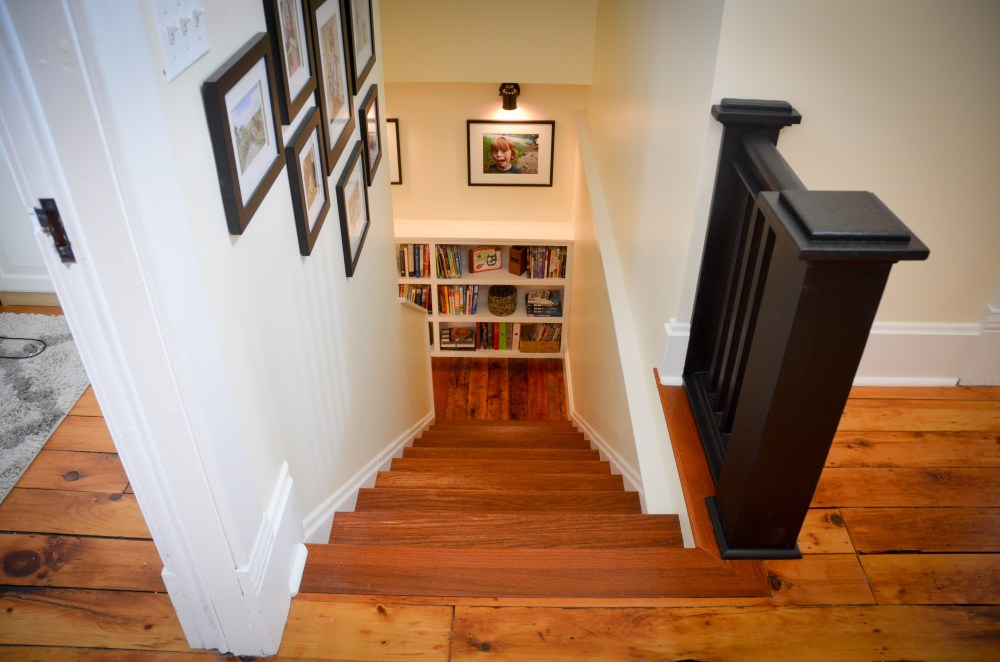
As we take you on a picture tour of the new staircase, we will point out how we acquired some of the skills needed to complete each part of this stair project. Here we go!
Framing and drywall – I had to learn this out of necessity through small projects in the past, like installing a pocket door in our previous house.
[Edit from Amy: Already you’ve made me a liar. Disclaimer: We did a few projects at our old house (which at the time we had no idea how to do) and learned that we could really do anything we wanted if we were willing to research. Okay, go on…]
I also learned how to handle joint compound through all my experience with plaster repair. So much plaster repair!

We still have work to do to finish this area, but we consider that to be a part of the playroom – which is out next big project.
Stair Skirtboard (the baseboards that go up the stairs) – This was trickier than I thought it would be. Mostly just because of angles, number of cuts, and making sure everything connected precisely with the existing baseboards at the top or bottom of the stairs and new baseboards on the landing. I felt confident to tackle this because of my experience with using the router to recreate the look of our original baseboards and also the carpentry work involved in the built-ins we have already done.

Salvage old flooring for the stair landings – We had already sanded and refinished ALL of our floors in the house, so this part of the stair project was a no-brainer. We are so glad we were able to get salvaged flooring that matched our existing flooring so that we could make the new stairs feel a little more integrated with the rest of the house. It sounds funny, but Amy and I are sometimes concerned about things looking “too perfect” because it will stick out. All the imperfections on the landing floorboards help!

Built-in bookshelf – My very first attempt at a built-in bookshelf was in the book nook under the stairs. Since then, I got more experience by including shelves in Lucy’s room, the laundry area, Lucy’s wardrobe closets, and three more bookshelves in the loft. Each one of these presented small challenges that I had basic problems to solve, like how to fit a shelf flush to the wall when the wall isn’t flat. None of these are super fancy and I’m sure I did a whole bunch of things that would make a real carpenter scoff, but they work for what we need.

Risers – I picked up some new tricks when researching how to do these. One thing I wouldn’t have thought to do was to cut the top and sides at a back angle of 5 degrees, This allowed me to get a tighter fit on the sides and allow room for adhesive on the top.
Treads – Staining and finishing the treads called on our experiences with the existing wood trim in our house that we have already finished. We have been doing so much of that in the past year as we entered the last phase wrapping of the home rehab project. Also, similar to the risers, I have gotten better at and been more accurate with my carpentry through experience (learning from my mistakes!). These treads fit tightly and there are no gaps to be found.
[Edit from Amy: Now YOU are lying. I did caulk some very very slim gaps. My caulk detail work makes your carpentry look perfect. You’re welcome.]
[Edit from Joe: Hey now! There were NO gaps on the treads. Maybe just a couple on the risers – but that was because of how tightly the treads fit. See – I did TOO well. It caused problems.]

Refurbished newel post and railing – This was probably the easiest part of the project and it felt good to finally drag this railing out from the shed, its home for the past 5 years. Since we used this railing in the same way it was originally configured, all I had to do was cut it down to length, sand, and repaint.
[Edit from Amy: True to form, Joe did several different paint jobs on this – testing out various white and black combinations and agonizing over it. In the end we settled on painting the whole thing black. I have to admit, I even changed my mind a few times. But I’m confident we made the right choice.]


Finish work – One part of this project that Amy and I were determined to get right was the finish work. Making sure we thought through all the details, like the added picture ledge, how the baseboard wraps around the corner at the top of the stairs, how the angled stair skirt transitions to the baseboard at the top of the stairs, and how the top bullnose extends past the wall far enough to allow room for the baseboard to wrap around the corner. Our prior experiences helped us to better anticipate where we might have tricky transitions and how to prepare for those ahead of time. Still, it’s not perfect, but for us it’s pretty good.
[Edit from Amy: I don’t know why he keeps referring to “us”. On this project I’ve been a glorified assistant at best. The staircase itself has been Joe’s baby and I can’t take the credit….except for the caulking, painting, scraping, sanding and staining- to which I deserve all the credit. On second thought, I guess I did do a fair amount. Just not the carpentry.]
One thing we didn’t anticipate was just how much we would want to BE on the stairs now that they are finished and actually a little cozy. For the past five years the stairs have been the ugliest part of our house – dirty 2×4 treads, dog hair carpeting the backside of the drywall underneath the treads, and particle board on the landings. Now, every time we walk up and down the stairs we feel we are able to appreciate this new space we created so much more!

One common theme that we have noticed in our home rehab projects is that when you DIY you are able to get things done exactly as you want it. Even the best professionals can’t read your mind and they aren’t going to take the same amount of time to think through a project to get it “just right.” We couldn’t be more pleased with how the staircase turned out and we definitely made the right decision to do it ourselves. Not only did we get exactly what we wanted, we saved thousands of dollars.
We continue to be thankful that we have a seemingly endless stream of projects to keep us busy through the COVID-19 quarantine (without needing to go to the hardware store). Next up, reinstalling the original porch ceiling. Once that is done – PORCH SWING!!! Perfect timing – everyone needs a comfortable way to hang out on the porch during this time of social distancing.
Stay safe everyone!

Amy & Joe the stairs look FABULOUS. I love the Black Paint on the railing, it looks really sharp. I have enjoyed your Blog so much …watching each stage of each room come together. You two have done an amazing job. Thanks for sharing your journey. Love, AJ
LikeLike
Congrats. They look amazing!
LikeLike
Bravo! It always feel amazing to get big projects done after living in chaos for multiple years.
We just finished the stabilization of our original staircase two years after moving in, but decided to hold off on the next steps (stripping and repainting/refinishing) until the world has settled down. I am hoping it doesn’t in its unfinished state too long.
LikeLike