If you asked us what aspect of the entire renovation has been the biggest struggle, the answer would probably come as a surprise. No, it wasn’t the big projects – like sanding and refinishing the floors, repairing the plaster, wiring the house, or rehabbing the old windows. It wasn’t even the fact that we did this while working full time jobs and raising kids. Nope. What Amy and I have struggled with this most, what always seems to grind our progress to a screeching halt, the biggest reason that it seems to take forever for us to release a new blog post with a finished room: selecting and arranging furnishings. Yep. No contest.
There are several explanations for this.
- We aren’t rich and prefer not to spend a lot of money on anything, but admittedly we do appreciate nice pieces of furniture
- We have tried to walk a fine line that balances the aesthetic of an old house with the preference for modern furnishings
- We don’t like shopping
- We are picky and generally struggle to pull the trigger on anything very quickly
- We are both creatively and aesthetically minded, which means we probably care more than the average person about the nest we create for our family.
Most of the furnishings in our house are new. Part of this is just that we didn’t have much furniture to begin with and also that the furniture we did have just didn’t work in our new house. To help overcome all of our issues listed above, we turned to a website tool called Modsy. Just so you know, we aren’t sponsored by Modsy and I’m sure there are other online tools that do the same thing.
Here’s how it works… You complete a style assessment online, take pictures of your existing room, and send the pictures to them. Then (for a fee) they create a 3D virtual space that looks exactly like your room with completely accurate dimensions. They will recreate items you already have and know you want to keep in the room. Then, they provide possible furnishings for it based on your style. The problem is, Amy and I are so picky that out of all the designs they sent us we only bought two items they suggested. The Modsy tool we did utilize was selecting our own furniture from major retailers and inserting them into the room ourselves. That allowed us to see how colors worked together, how spacing worked out, and gave us the ability to “walk” around the room virtually and see the room from every angle. ALL of the purchases we eventually made for these three rooms were things we picked out using this virtual tool. We were skeptical at first but in the end it was definitely worth it.
[Edit from Amy: Using Modsy was a game changer for us. With Modsy you can duplicate your room as many times as you like and make different versions of your room. There is no time limit which is good because I chipped away at designs for a long time, revisiting them over time. I had a lot of fun doing this and it allowed us to think creatively and outside of the box with our layout and style with minimal effort or risk.]
We ended up using this service for the three rooms that needed the most furniture – the piano room, living room, and playroom. As an example, here was how Modsy originally designed this area of our piano room:

Not really our style, BUT here is how we adjusted it with our own suggestions using the website tools:

And here is a reminder of what that area of the room ended up looking like:
Pretty cool, huh?
Before we show off the completed living room, let’s take that familiar trip down memory lane…
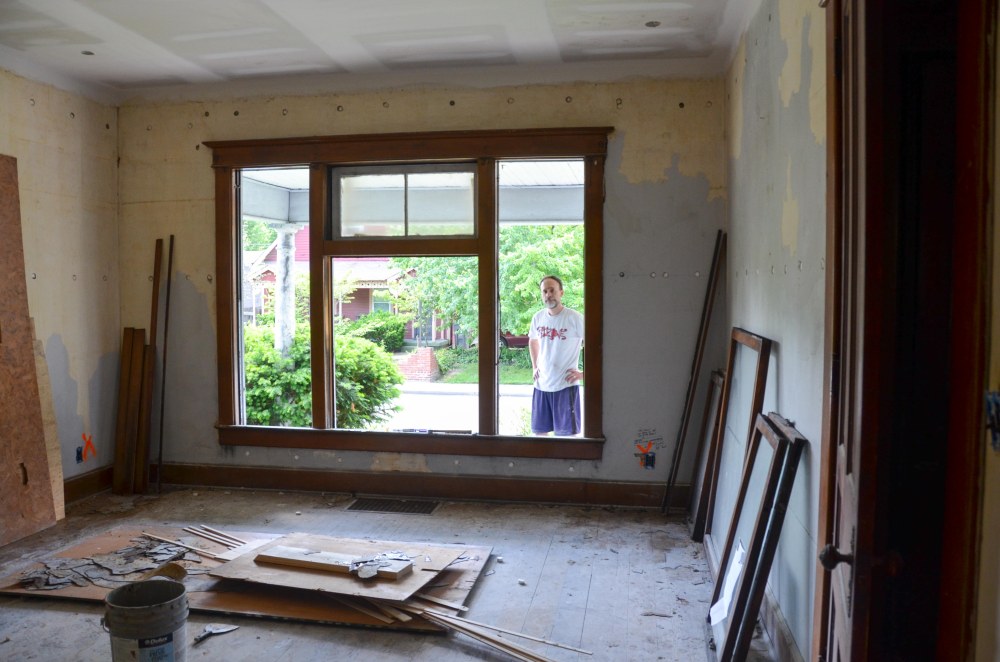
This was our first view of the living room.

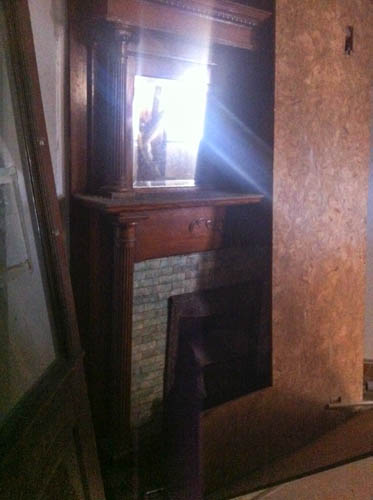
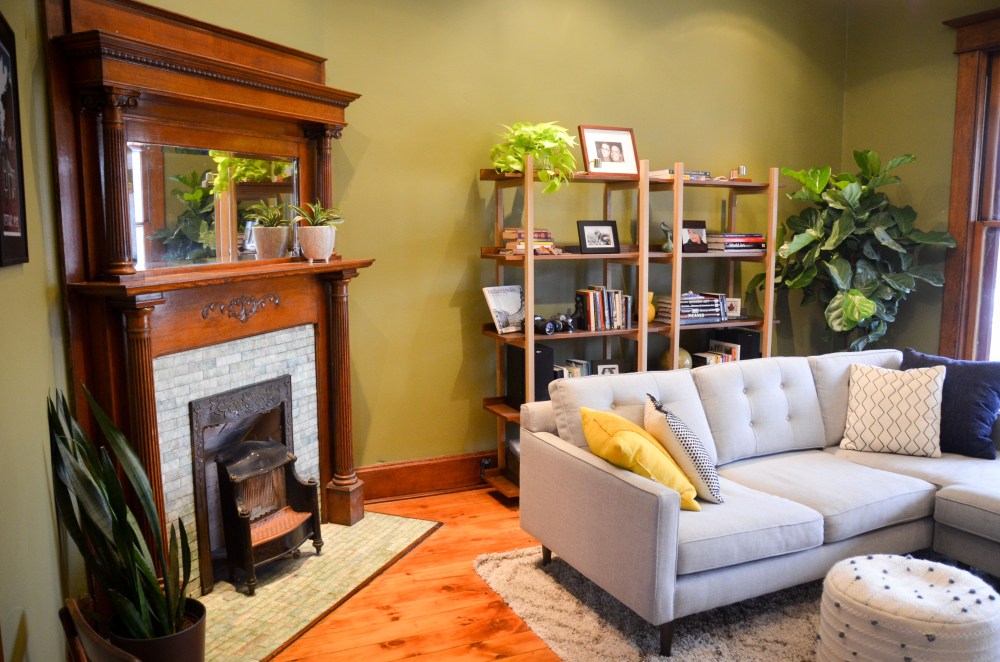
One of the main features of the house was this beautiful fireplace with original gas heater…
and of course these big, beautiful windows!

Like the living room, vestibule, dining room, and playroom, this room involved “just” restoring the original surfaces. I put that “just” in quotation marks because restoring the original surfaces was a LOT of work. I guess before getting to restoration work we did do a few things.
We added sister joists to the ceiling because it was a long span and the floor above (Lucy’s bedroom) was a little bouncy…

and also added all new wiring for electrical outlets and lighting.

Then the restoration work began. Up first was removing scraps of old wallpaper which had been painted over.

And then washing off all the glue to expose the original plaster.
Insulation was blown into the walls and, at some point (windows are all a blur now), I removed the windows and completely restored them.
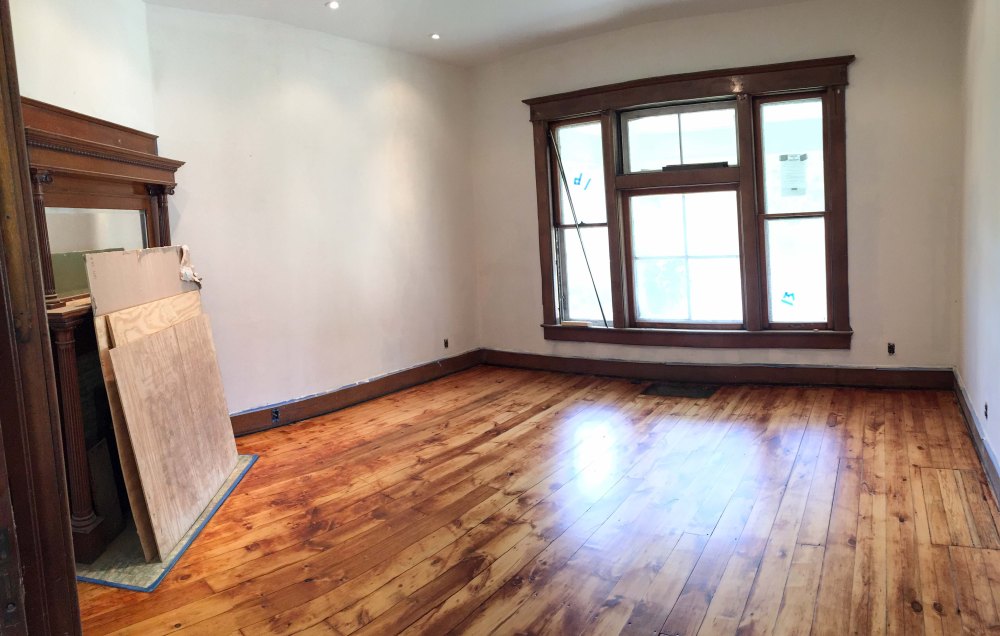
After a TON of plaster repair, the walls were primed, and we sanded the floors.

And then refinished them.
And then we moved in! This is basically what it looked like with our old drab furniture and unpainted walls, but we did eventually did get a couple new couches and painted the room.

Several months ago, after finishing the piano room, we finally moved on to finishing this room. By now you already know the routine – We emptied the room, refinished all the woodwork, painted the ceiling, repainted the walls, and then took forever to select furniture that we liked.
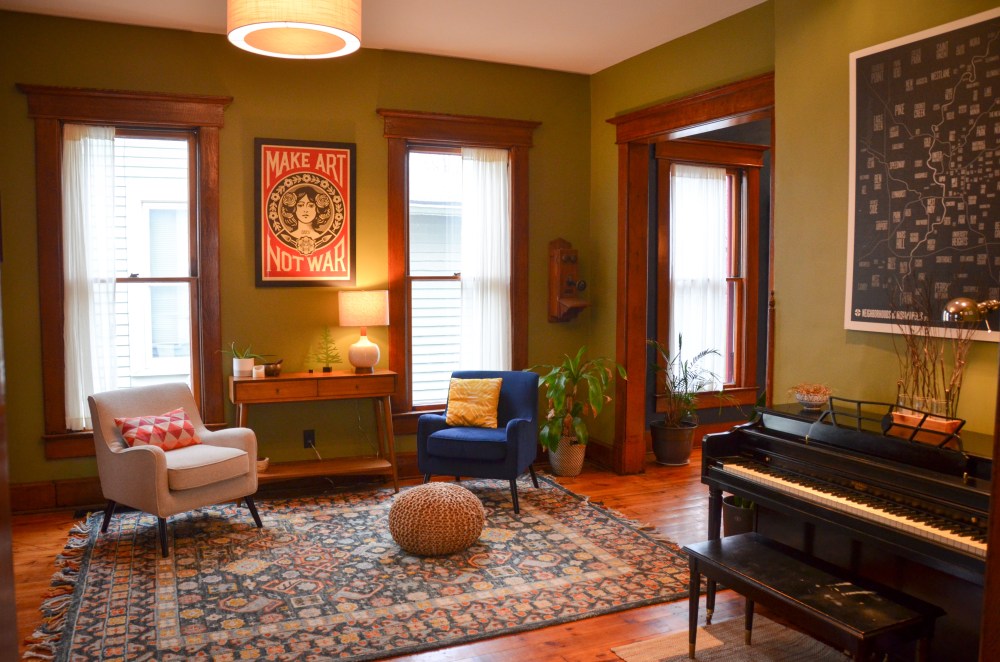
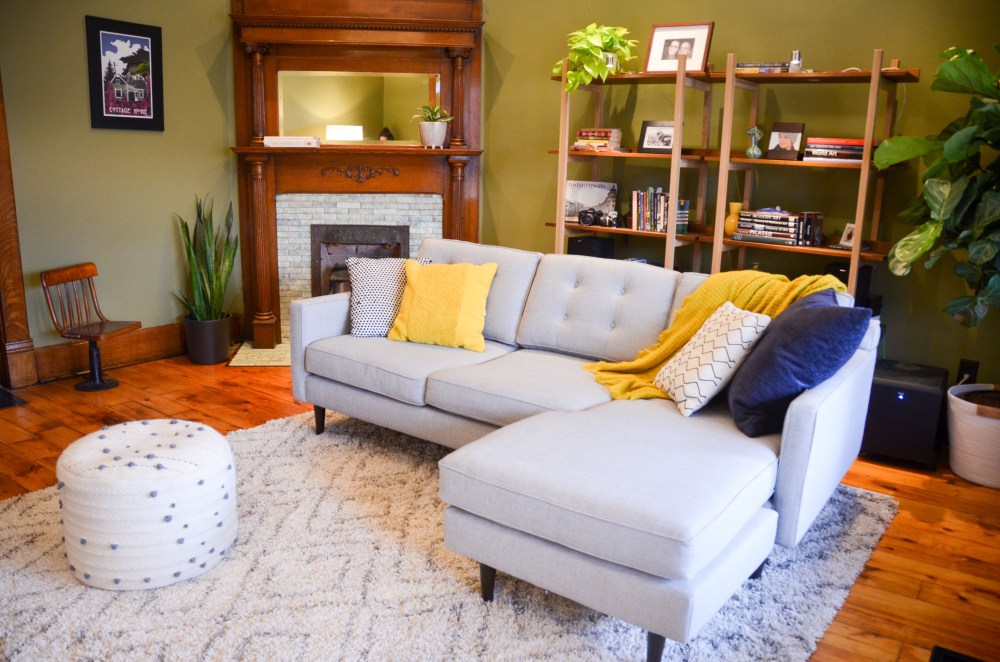
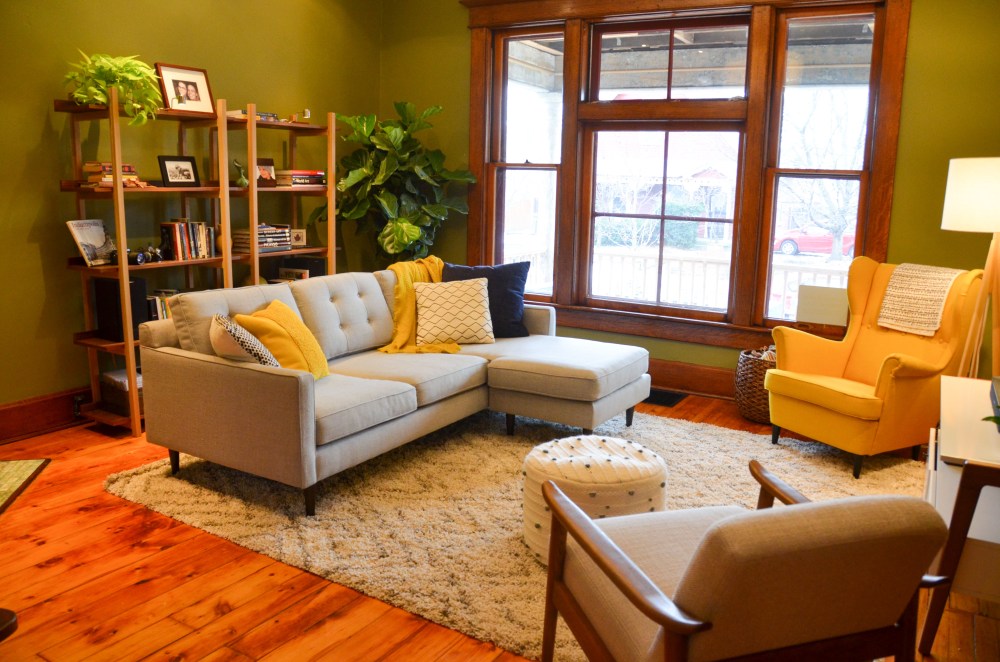
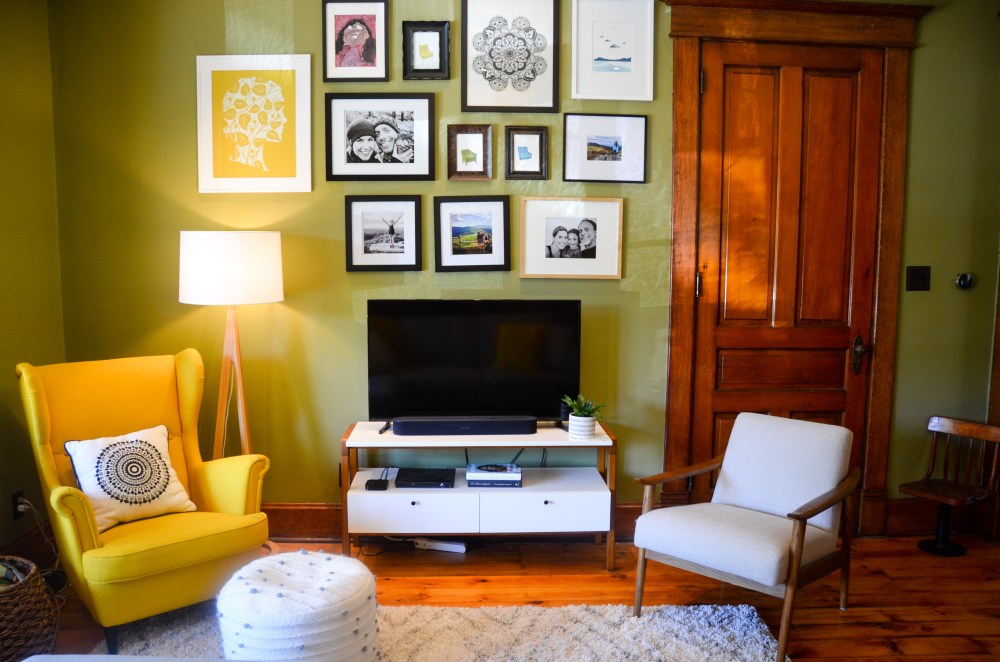
But we are now ready for the big reveal. Here is our completed living room!
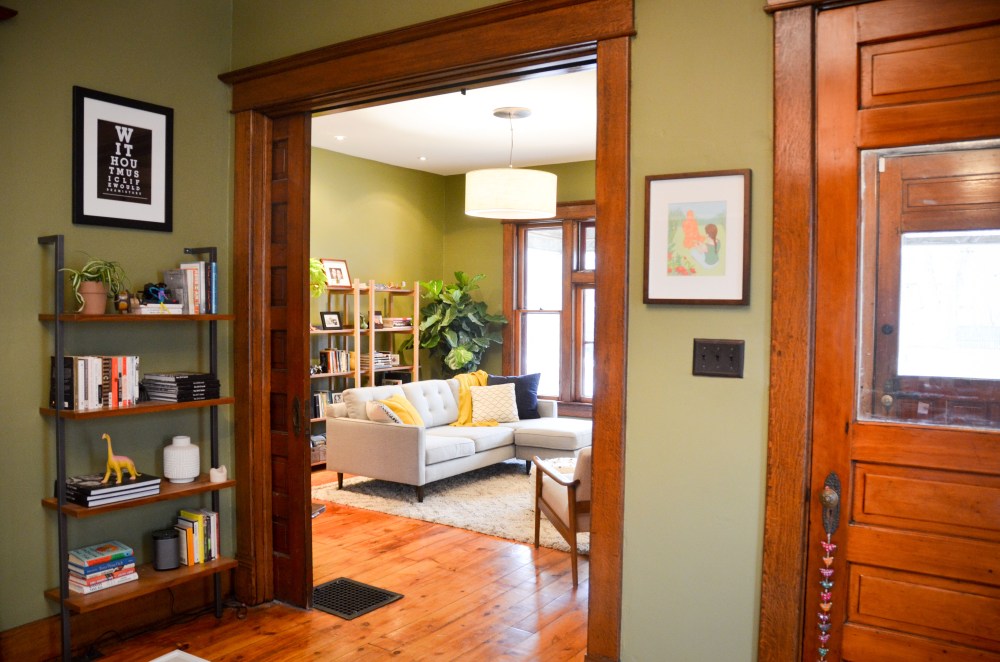
The view from the piano room…
You might notice we don’t have any curtains. This has been a big question for us. We did originally have curtains in this room, but hated how it covered up the beautiful window trim. Then we experimented with sheer curtains that were inset in each window, but we thought it looked a little old-fashioned compared to the style of furnishings we selected. In the end, we decided to go with cellular blinds that can be raised from the bottom or lowered from the top. They are barely noticeable (not installed yet when we took these pictures – so that’s why they aren’t noticeable at all). We always have them lowered completely during the day to let in the sunlight and then raised about halfway at night for privacy. But I still wonder if the lack of curtains is one reason the room still doesn’t seem quite finished to me yet.
[Edit from Amy: You guys, it’s finished.]

Just in case you are curious, here is the first design that Modsy did for our living room (pretty off the mark if you ask me):
[Edit from Amy: From here I made several new designs that flipped the direction of the couch and tried out a lot of different arrangements. This was a really tough room because it has a fireplace on a diagonal wall, a TV and huge windows….a lot of focal points to design around.]
Here is what the room actually looks like facing that same direction:
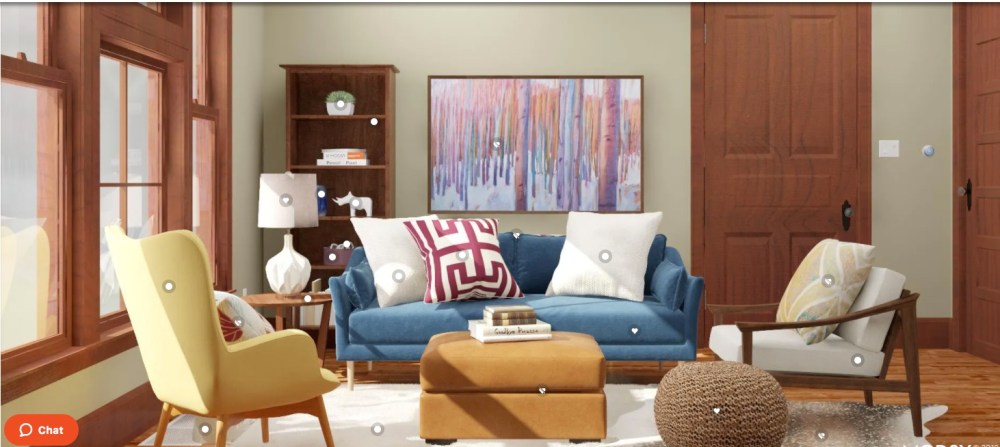
And this is the 11th design (yes, 11th!!! – I told you we were picky):

This was the final result (after getting rid of the coffee table, moving that lamp somewhere else and replacing it with a large plant, and switching around some chairs):

That’s not the best picture of this space – it makes the couch seem WAY bigger than it really is. But it gives you a comparison with the Modsy design.
Like I said, we don’t feel like the room is 100% complete. [Edit from Amy: Yes we do.] I’m still not sure about curtains and I also think we might be missing just a couple pieces of artwork on or above the bookshelves and/or over by the yellow chair. But, it’s close enough for now. We have learned not to rush design decisions. It will all come together some day, but probably well after we officially proclaim our house “complete”.
It’s hard to believe, but we only have ONE MORE space inside the house to finish!
But next up, landscaping! If you live in the neighborhood, you already know.

Thank you for sharing your adventures and talents! One day I am going to build my own CoHo treasure. Your posts are so inspiring.
LikeLiked by 1 person
Beautiful. I think the windows look great without curtains. We don’t have curtains on any of ours (though we might put some up in our master bedroom at some point) and I love not having them.
LikeLike
Thanks, Tiffany! Yes, I think we will just leave the windows without curtains. They just seem unnecessary. It keeps the room from feeling “stuffy”.
LikeLike