In our last post I described the process of cutting and fitting the butcher block countertops for our kitchen. Everything went smoothly, but one issue we had was warping with both of the 12′ boards. I am assuming this happened because we stored them in the shed during a hot and humid week. After getting the butcher block in place, we waited a week to let the wood acclimate to the dryer conditions inside. It was difficult to tell, but it seemed like the countertops were starting to slightly unwarp. We were confident we would be able to flatten them out when we installed them, so we moved all the countertops again and began the process of sealing the wood. On the underside I used shellac. This gave us a hint of what our countertops would look like.

Once the shellac was dry, I flipped the butcher block over and began sanding… starting with 80 grit, then 120, then 220.
It was finally time to secure the countertops to the cabinets. I drilled 1/2″ holes through the corner braces of the cabinets and then also strategically attached L-shaped brackets to the insides of certain cabinets. I made sure to use washers so that I could use holes that were big enough to allow for expansion and contraction of the wood. We were easily able to flatten out the countertops and get rid of the bowing that had occurred.
The only parts that really took some finagling were the 45 degree angles and cuts but we were able to get them pretty tight.
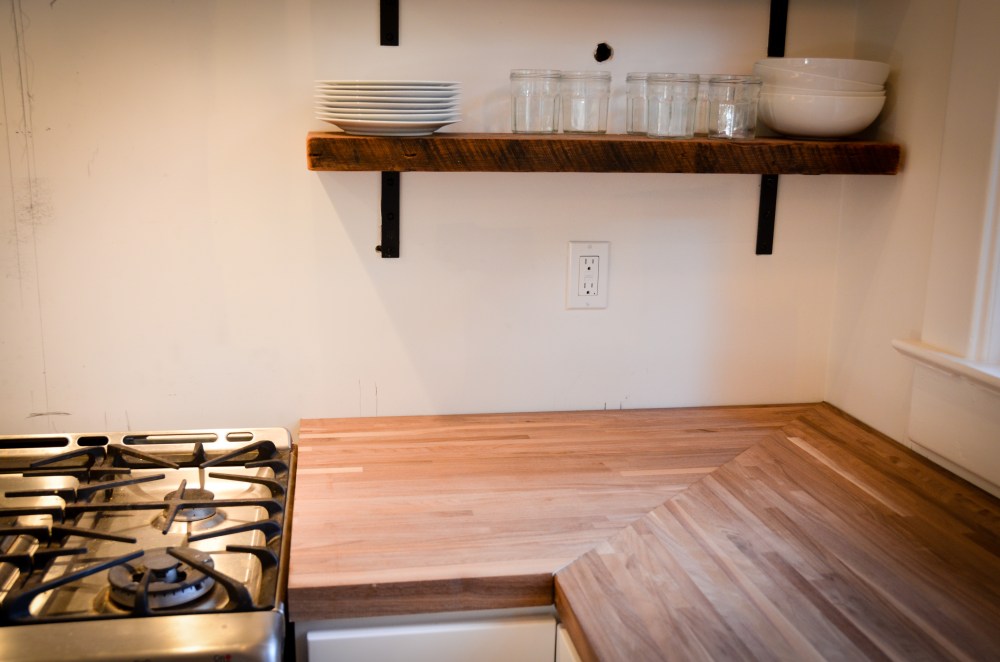
We wanted to make sure they were as level as possible so that there wasn’t a height difference, but this was tricky because these two boards happened to warp in opposite directions. Once we attached them to the cabinets the height difference almost disappeared. I was able to get it perfectly smooth with a little bit of sanding.
We also didn’t want there to be any gaps where the two boards met. I have read that some people use a router on the underside to create a channel for toggle bolts, but tightening the toggle bolts was going to be a logistical nightmare due to the lack of access. Our cuts were accurate enough that it ended up just being a matter of pushing them together and screwing them down. I wish someone had taken a picture so that you could enjoy the image of me contorting myself inside the “lazy Susan” to tighten the butcher block to the brackets while Amy knelt on top of the counter and pulled the two pieces together.
The final step was to do a little cosmetic work on the joints where the butcher block pieces came together. I used some of the left-over sawdust and mixed it with wood glue and then shoved it in the little crack between the boards. After letting the glue dry I then sanded the seam.

I wiped all the countertops with mineral spirits to pick up any lingering sawdust, let it dry, then applied the first coat of oil. Some people treat the top of the countertops with polyurethane to protect it from water or stains, but this also means it isn’t food-safe. I have also read about people using waterlox, but this seems to cause a discoloration (I could be wrong about that). I chose to just use a combination mineral oil and wax which is used as a specific treatment for butcher block. The oil and wax seal the wood, keep it from cracking, and work to resist water. Also, if there is a stain, scratch, or spotting from water, I can very easily sand it and put reapply the oil/wax. I might eventually just switch to using only mineral oil (because it is really cheap), but for now I will use this.

After applying the oil to the countertop, I let it dry, wiped up any excess, and then repeated the process four times. I will do one re-application every week for the next month or two, then probably once a month. It literally takes a few minutes and is pretty satisfying to do.
So, here is the big countertop reveal!

I have to admit that there was a day or two where I was very reluctant to actually use the countertops. I remember feeling the same way after I sanded and finished the hardwood floors… I didn’t even want to put a ladder up for fear of scratching the floor. We have now gotten over that with the countertops and use them just like we would any countertop.
Here is the part I am most proud of…
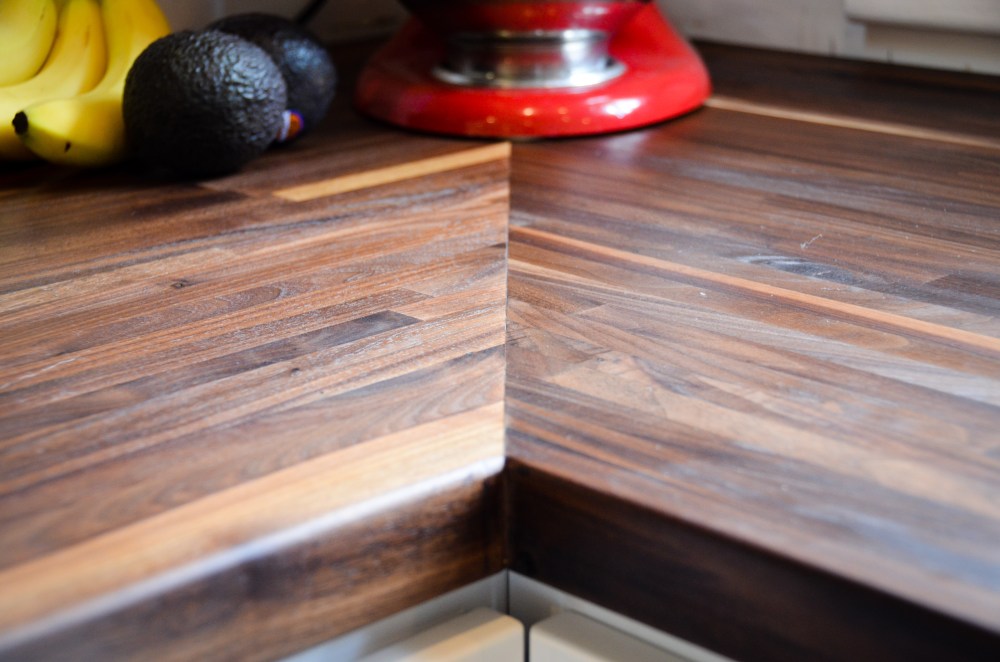
The corners turned out better than I thought they would. There is zero gap and when you run your fingers over it you can’t even tell it is two pieces of wood!
I was able to sand the inside rounded corners at the back of the sink and it turned out great. One corner is a little better than the other, but no one will ever know.

We did order a protective grate for the bottom of the sink. Since the sink is made of fireclay, it could chip if something extremely heavy were to fall on it. I don’t want to baby the sink, but I also don’t want anything to happen to it. We have really enjoyed that the sink is large enough to fully fit baking pans, frying pans, and… actually, everything. The one thing we don’t like is that the food scraps don’t easily wash to the center of the sink because the bottom is pretty flat.

After finishing the countertops, I was finally able to add the very last cabinet. It sits directly on the countertop and provides the perfect place to store our blender and it’s accessories.

The additional cabinet on the countertop also creates a nice little “breakfast nook”

Notice in the picture above that I modified the cabinet to create a built-in microwave. (Don’t notice how crooked our refrigerator is.)
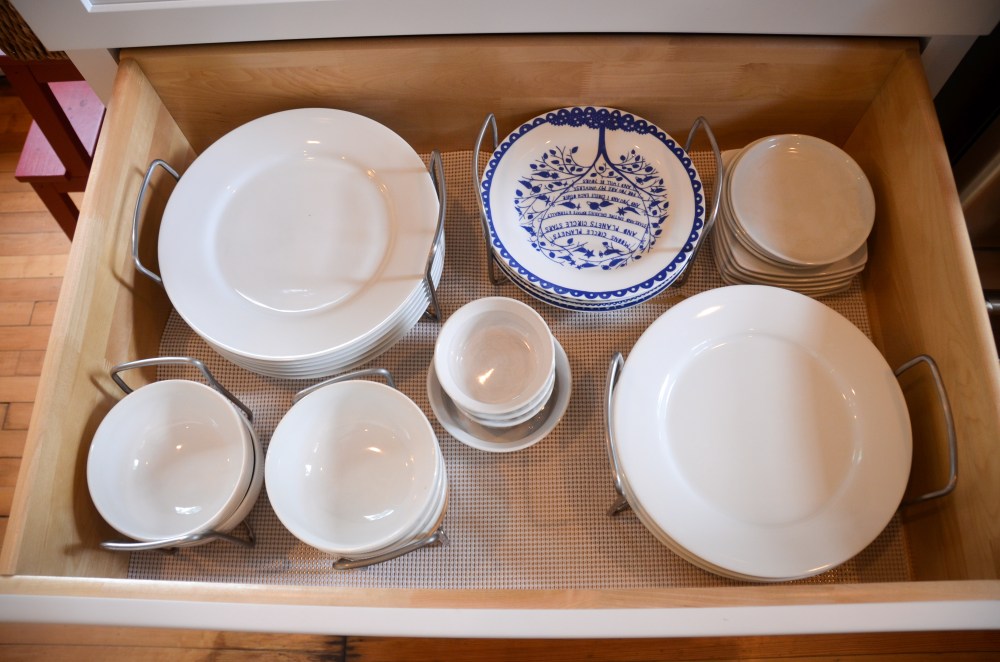
We also really enjoy the large pull out drawers that allow us to stack our plates and bowls.
Another small thing that is standard in most kitchens now, but seems like a luxury to us is the pull-out trash. It is perfectly placed next to the sink and also has an additional bin for our recycling.

After the countertops were completed, I was able to finish the trim around sink to complete the modified cabinet. I also created a custom toe-kick for the dishwasher.

If you are considering installing butcher block countertops, you should make sure you are okay with small imperfections and “character.” Water and wood do not get along. I have only treated the countertops a few times, but water on the countertop is totally fine as long as it is wiped up in a reasonable amount of time. If you leave a wet cup or allow water to stand, it will definitely leave a mark.

Now don’t freak out, this is very easily fixed with another coat of oil/wax. Also, it’s not nearly as noticeable as it seems in this picture (I zoomed in A LOT). In fact, I will say that the butcher block HIDES more messes than it shows! I also think that as I continue to add coats of the oil/wax it will become even more resistant to water. The bottom line, if you want your countertops to look perfect at ALL times… butcher block is probably not for you. On the other hand, if you don’t mind small imperfections (which are all easily fixed) and think those imperfections add character, than I would highly recommend butcher block. It adds a tremendous amount of warmth to the kitchen, is appropriate for the style and character of an older home, and makes all your food look better when cooking! Oh, and it is one of the more affordable choices, especially if you want to avoid laminate.
It’s always fun to take a look back to see how far we have come…
Here is the kitchen after we removed the old bathroom and pantry and removed the crumbling plaster.

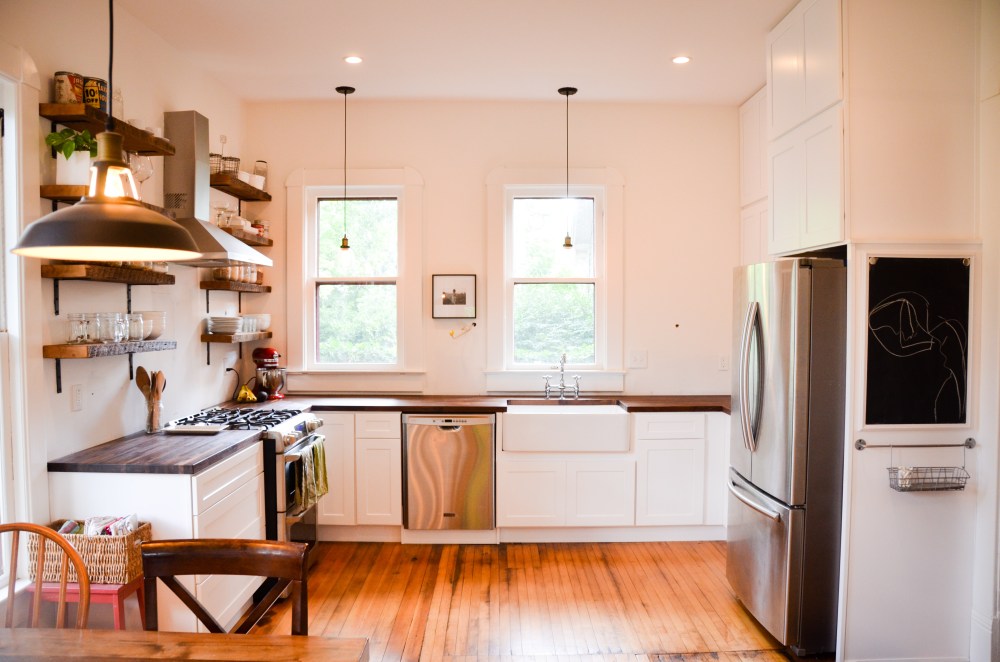
It is still new, but Amy and I continually marvel at how we can both cook at the same time and not be in each other’s way. We can use countertop space all over the kitchen, wipe messes directly into the sink, and don’t worry that the dishwasher is going to tip over because the weight of books on top don’t weigh enough to counter the dishes when we are loading the dishwasher. One of biggest things we’ve noticed is that the kitchen feels SO much bigger! We were expecting the opposite because of the addition of upper cabinets.
We still need to add tile, lengthen the vent hood so that it reaches the ceiling, find new chairs, and add several other design elements, but it is a drastic improvement from what we have been using!

I am so in awe of your talents! Your kitchen is beautiful! I’m sure your family will enjoy many great meals there!
LikeLike
The time and patience to do all of these remarkable renovations is unbelievable. The skills to do all of this is mind boggling👍
LikeLike
Beautiful! I want to tackle my kitchen soon – but I’m currently working on our tiny bathroom in our 1920’s Little Flower home (so just a few miles east of you!) I really love seeing your progress – Cottage Home is my favorite neighborhood in Indy.
LikeLiked by 1 person