Our original plan was to spend the spring and summer months working on the exterior of the house. We wanted to fix the porches, add missing trim and siding, and paint the entire house. Well, that didn’t happen. We had trouble finding someone willing to help with the porches, then it just seemed silly to paint if the porches weren’t done. In the absence of a solid path forward on the exterior it occurred to me that we should get going on the kitchen instead! I managed to convince Amy that since we spend way more time in that one room of the house than any other, we should spend the summer renovating that space instead of the exterior. Plus, we have been designing that space in our heads for several years now – we pretty much know what we want. She agreed and we began chipping away at the prep work.
I won’t take the opportunity in this particular blog post to go way back to the beginning of our kitchen renovation.

Well actually, this would be the very beginning…

Nope. This post starts with the kitchen as we have been living in it for almost three years…


The garage shelving and stand-alone appliances have served us pretty well, but it was definitely time to move on. We took a trip to a cabinet company that we had also visited earlier in the winter. Turns out that the cabinets we were interested in were temporarily 20% off. That was enough to motivate us to get moving and make some decisions a little quicker than we would have otherwise.
I could dedicate a whole blog post describing the many painfully difficult decisions we have had to make as a rehabbing couple. But I can pretty safely say that the only time our marital happiness was briefly tested was when we were laying out electrical plans and thus finalizing the placement of everything in the kitchen four years ago.
[Edit from Amy: Yes, the kitchen was the most trying room of the whole house. The good news is, Joe still likes me….even if the pendant that hangs over the sink is two inches off center (Shhh, it’s true.)]
[Edit from Joe: Actually, I think’s almost 3 inches. But who’s counting?]
[Edit from Amy: You.]
Thankfully, we had already gone through the pain of that creative process way back before we even moved in. We didn’t need to revisit it again this time around. Except, it’s possible that I briefly considered switching everything around a couple months ago. Remember that, Amy?
[Edit from Amy: That was unacceptable and I have long since ejected that memory from my mind.]
Let’s fast forward. We placed the order for the cabinets and had them scheduled to be delivered a couple of days after our big summer trip. We also made final decisions on the sink, faucet, counter tops, and tile. Everything was ordered and read to go.
We cleared all non-essential items out of the kitchen (which Lucy quickly claimed as her new dance studio)…

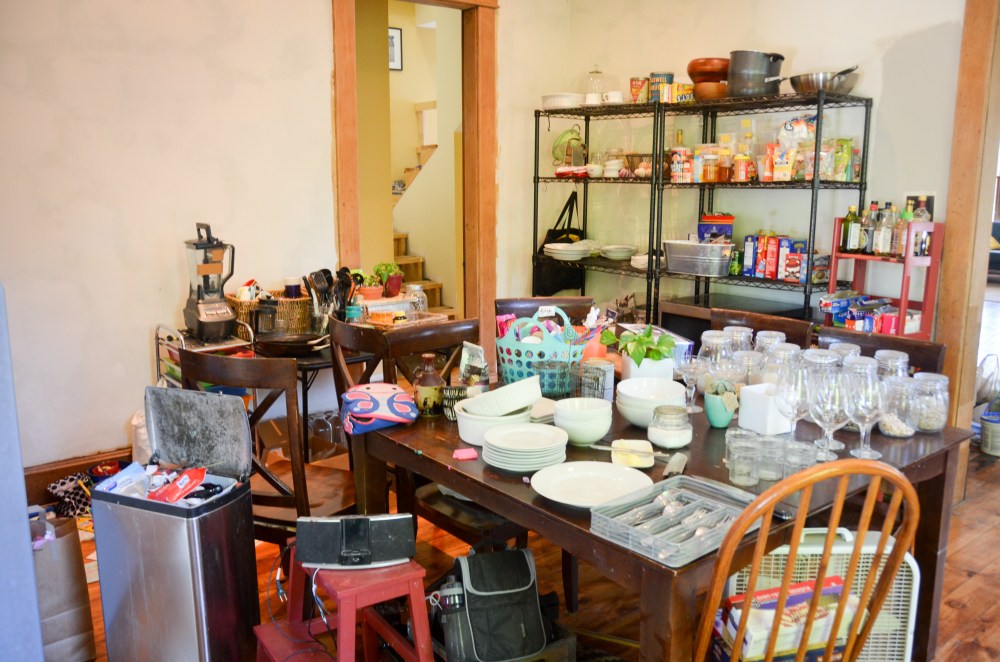
We transferred most of the food, shelving, and cooking supplies to the dining room…
[Edit from Amy: Living like this was fun and amusing for about half a day.]
We covered everything that remained in the kitchen under plastic and then began painting the ceiling and walls. We also did a lot of work repairing and painting all the trim.
[Edit from Amy:….Because we DO NOT mess around anymore with paint. Seriously, we are done picking tiny flecks of paint off the floors and objects. When we paint, we mummify the room. Done deal. Also, the phrase “repairing and painting all the trim” was way more labor intensive than it sounds. But it’s fine, we can skip over it. Joe, continue…]

After two great weeks of vacation on the east coast of the USA and Canada, we drove back ready (and excited) to begin installing our cabinets. We were super disappointed to be informed on the morning of the scheduled delivery that they were running behind and wouldn’t have our cabinets built, let alone delivered, until the END of the week. Why were we not surprised? We kept busy during the week with other renovation projects until the cabinets were finally delivered the following weekend.
We were not afraid to install our own cabinets even though this was completely new to us. Most things we have done are completely new to us. We are getting used to that. That being said, there is no handy set of IKEA-like instructions that tell you how to install your cabinets. In fact, there is no information whatsoever. But that’s okay, I had already done my research and just figured I would learn more as I went along.
[Edit from Amy: That’s why YouTube and Goole were invented]
What I now know is that the average installation is not terribly difficult. Ours is probably not average. It features triple stacked cabinets that go from the 10 ft ceiling to the counter top, an uneven floor, uneven bowing walls, and a sink cabinet that needed to be completely customize for the apron-front farmhouse sink we picked out. Undaunted, we started at the very top. Slowly but surely we shimmed and measured, adjusted and leveled until each cabinet was just right.

We kept multiple clamps, shims, and levels close at all times.
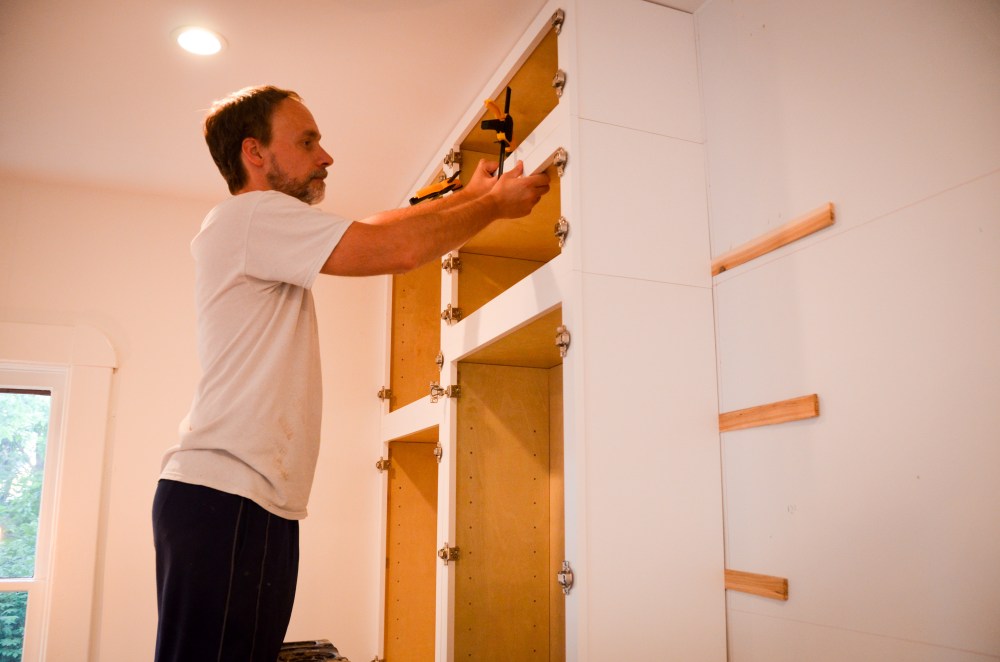
The two cabinets above the fridge were our biggest issue and first problem to troubleshoot. The cabinet company ordered 36″ inch cabinets to go over our 36″ fridge. That sounds correct but in reality you need more than that to fit in the side walls that were supposed to cover both sides of the fridge.

We really wanted the fridge to be covered by the white side panels, so we decided to create a ledge sticking out from the bottom of the lowest cabinet. This allowed one side panel to be out further and create enough room to be able to fit in the fridge. In the end, we always seem to end up customizing our way out of problems. In fact, it seems like problems sometimes result in POSITIVE changes. In this case we like that there is now a ledge that breaks up the solid mass of a 10 ft panel.

While I was busy making adjustments with the fridge, Amy got to work installing and adjusting the cabinet doors and attaching the interior walls of the cabinets to each other. At the end of the day our upper cabinets were secure, level, flush, and sawdust free.

On day two we started adding the lower base cabinets. While the upper cabinets only have to be shimmed to adjust the bowing of the wall our base cabinets were significantly more time consuming since they required adjustments because of the un-level floor AND the uneven wall. In addition to that, we had to be mindful to keep the exact same overall height all the way around the room. It’s not rocket science, but it just takes a good dose of patience, persistence, and stubborn perfectionism.


Amy got to work making some minor modifications from our original electrical plan that originated more than 3 years ago.
[Edit from Amy: We moved the dishwasher over a few feet which meant fishing the existing cable through a new cabinet. I also finally installed our remaining outlets and cut power to two of three locations originally meant to be hardwired for under-cabinet lighting that we are no longer going to use.]

As a design team, Amy and I find ourselves doing all sorts of over-the-top things such as practicing different handwritten fonts for our spice labels. It’s important to us, okay?
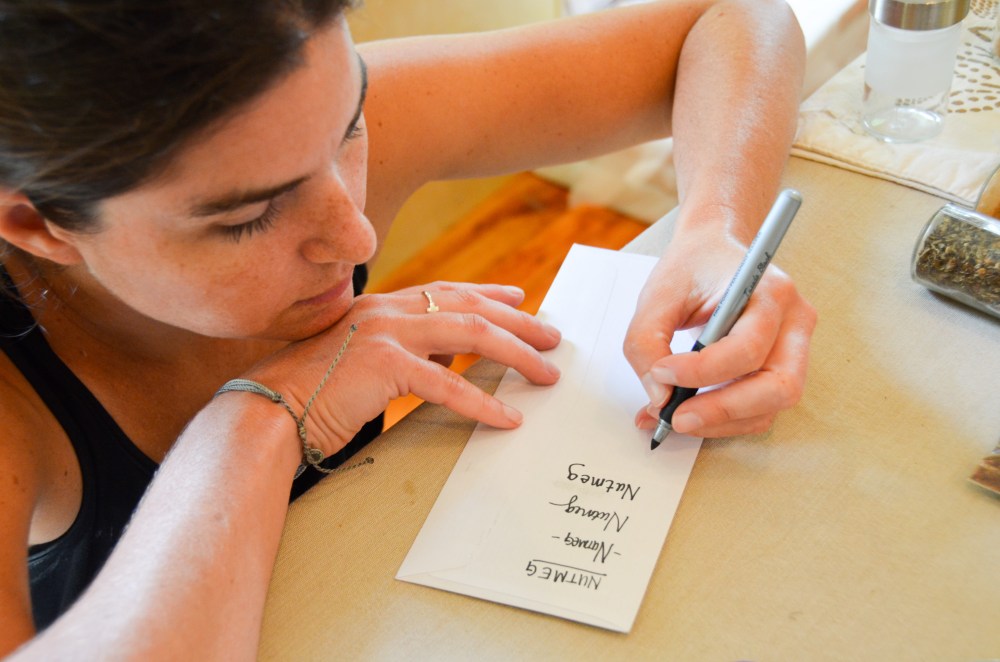
Speaking of important to us, this spice drawer is way more exciting to us than it should be. But this is a huge leap from the dirty cardboard box that was previously used for spice storage. Now I feel like I hear choirs sing every time I open this drawer.

It took us a day to install most of our base cabinets and then a little additional time to customize a cabinet to support our very heavy new farmhouse sink. More on that project in the next post.
Now with all the cabinets installed the kitchen looks so…. grown up? No more cardboard boxes and garage shelving for us.

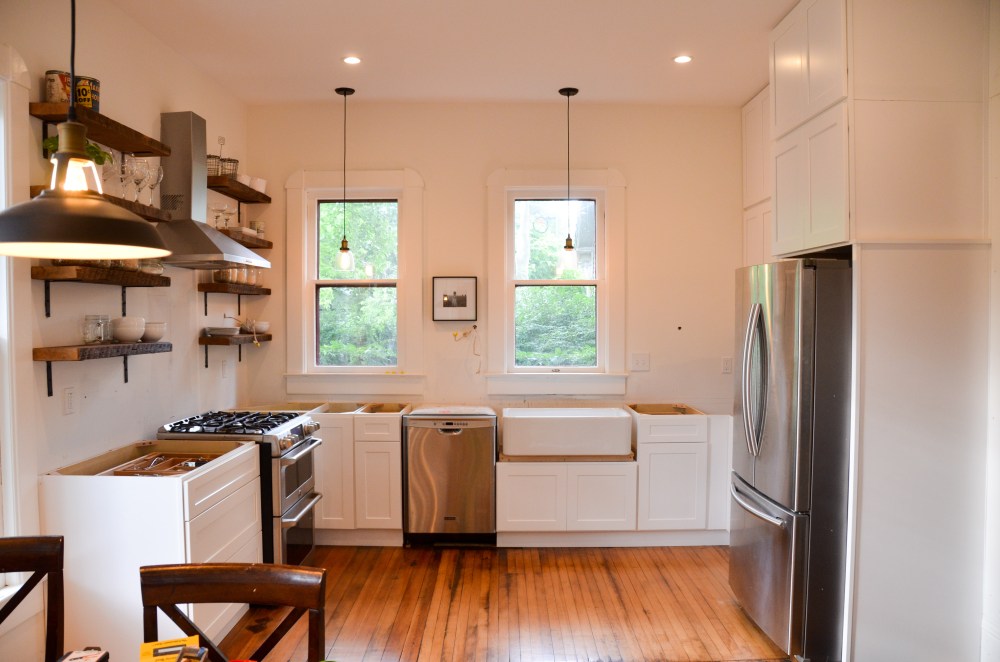
Next up….cutting the counter tops, installing hardware, modifications to the microwave cabinet, finishing the sink cabinet, creating a toe-kick for the dishwasher, finishing the plumbing, and lots of little details to touch up. Oh yeah, and install the tiles for the back splash! Almost forgot about that. Still a ways to go.

What a creative design, just amazing. I can’t wait to see the end result.
LikeLiked by 1 person
You two are amazing! It looks so good already! Can’t wait to see the final product!
LikeLiked by 1 person
WOW, WOW, WOW! Your kitchen is lovely you both should be so proud of yourselves and your ability to work together and make each room come together. So proud and happy for you both and your children.
HOME SWEET HOME!
HUGS
LikeLiked by 1 person
It’s wonderful! There are some similarities to the layout of my kitchen, which will hopefully be ready for renovation in 2 years. Just a question, what are you doing with the lower corner cabinets? I have been struggling with that.
LikeLike
Thank for the kind words. One of our corner cabinets is a lazy Suzanne. The other one is empty.
LikeLike