Amy and I consider ourselves to be very lucky. While the coronavirus wreaks havoc on the world and upends many people’s lives, we are fortunate to be in good health, we will most likely remain relatively financially secure, and our jobs as teachers allow us to stay with our kids while working from home. We realize that many people have it much worse, and I hope it isn’t insensitive of us to write about what we are doing to pass the time. For us, all this extra time at home has sped up the pace of the home rehab project… as long as we don’t run out of supplies.
Our goal has been to finish the entire home rehab project by summer. There are three big projects that remain – the playroom, the staircase, and painting the exterior. We started scraping and sanding the trim and doors in the playroom about a month ago and once that was completed we paused to turn our attention to building the staircase. [Edit from Amy: For those of you who have been in our house, you know we’ve been living with construction stairs for five years. A lot of people (especially our kid’s friends) have been very vocal about their annoyance about the continued state of the stairs. “WHEN are you doing to fix your stairs??!!”]
We were fortunate to have started on the stair project back in February and we got almost all of our materials before social distancing became a thing. We were then able to do one last trip to stock up on any possible remaining supplies we anticipating needing to keep us busy with projects for the foreseeable months ahead. Hopefully we thought of everything, because there are no quick trips to the hardware store now!
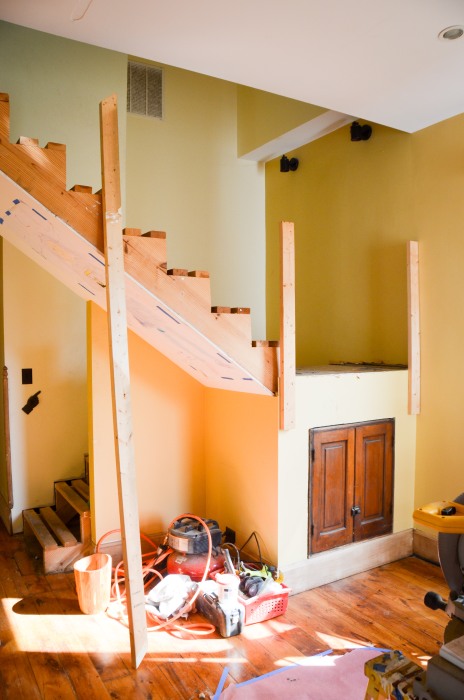
The staircase has been one of the biggest challenges since the very early months of our renovation 5 years ago. The original stairs were nothing special – just a very steep death trap that led to the master bedroom. And to access these stairs you had to go through a bathroom or the kitchen.

We wanted to utilize the rest of the space upstairs, so it was necessary to build a new stair case that was more centrally located and less dangerous for kids. A friend of ours (who happens to be a great carpenter) did the framing for the new staircase after we begged him unrelentingly. The staircase hasn’t changed much since he finished. In fact, when thinking about the areas of our house that still needed work, we almost always forget about the staircase. We just got so used to the “construction stairs” with 2x4s as treads that we didn’t think it was a problem. I mean, we could easily go from the 1st floor to the 2nd floor, so what’s the issue?
[Edit from Amy: I’m actually going to miss the construction stairs.]
Since the very beginning we imagined that we would finish our stairs to look something like this…

Something relatively simple, but something that looked like maybe it was built in 1910. But we could never shake a couple nagging thoughts – We didn’t feel good about trying build something to look like it was original to the house because we felt that would end up looking tacky. And even if we did want to try to make the stairs look original, that was going to be difficult because our stairs are not typical. They are essentially backwards, with the bottom portion of the steps being hidden in hallway and then becoming visible at the landing. We couldn’t find any examples of staircases that looked like this. I invited another neighbor (and fellow home rehabber) over to talk through some ideas, and that’s when it finally became apparent what we needed to do – We needed to add a wall and fully enclose the stairs. It all made sense now! Our staircase is not located in a place where you would expect to see something grand or formal. Plus, most Victorian cottages, if they have a staircase at all, have small, informal staircases.
This new design decision would also make the playroom feel a little more private and allow us to create a staircase that felt more like a transition to the upstairs, which is newer and more contemporary in design. Then the creative juices started to flow… we could build a bookshelf for the landing to give it sense of place and we could create a small ledge along the stairs for pictures. This decision also eliminated almost all the unanswered questions about newel posts, handrails, spindles, and how that was all going to work with our odd layout. If only we had come to this conclusion 5 years ago!
The first step was to create the wall that would separate the staircase from the playroom. This was hard to imagine at first, we had become so used to the open feel of the staircase. But the more we thought about it, the more excited we got about separating the two spaces and allowing them to each feel a little more purposeful and intimate.
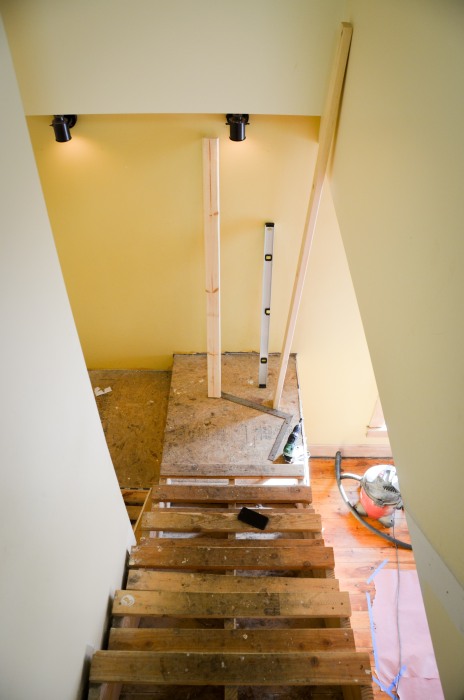
The first step was to frame the wall that would enclose the staircase.

This turned out to be no big deal, especially with the help of a laser level.

Before finishing the drywall, Lucy took the opportunity to draw a family portrait in one of the stud cavities. She also picked out a stuffed animal to be discovered in the future by a surprised home rehabber.

The next step was the mudding. I’m not great at this, but I do have a TON of practice from doing extensive plaster repair throughout most of the house. I told Amy that I need to make sure I don’t do too well on the drywall mudding so that it blends in with the plaster walls. I want it to look authentic, right? (Actually, it turned out much better than I thought it was going to)


This is view from the other side of the new wall. Notice it doesn’t line up with the existing wall above it… that’s where we are going to put a small ledge.

I also had to add more framing and drywall to create a half-wall where the stairs change directions.

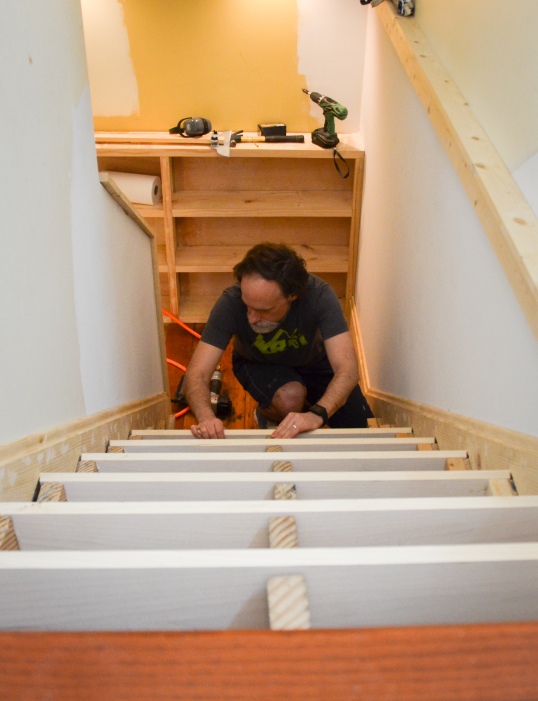
You can see in the picture above that we are adding a built-in bookshelf to the stair landing. We are extra excited about this new detail!

As you might expect, I have spent a lot of time just staring and thinking. Soooo many things to consider… treads, risers, baseboards, stair skirts, salvaged flooring, built-in bookshelf, picture ledge, original newel post, bullnoses, sanding, staining, finishing, and installing. I had to write down an order of operations and then revise it several times. It’s not just that there is a lot to do, it’s that these things all interlock.

We got some old pine flooring for our stair landings from our local salvage shop that matched our other floors. Amy did all the dirty work of scraping and sanding.

After cutting the stair skirts, I used the router to match the details from our existing baseboards.


To install each riser I used a tool to custom fit each one to minimize any gaps on the sides.


We added poly to the floors and installed them on the landing. They are the exact same floor material as the rest of our house and they help tie in this new space to the old spaces. We stained the bullnoses to come close to matching the color palette of the floorboards.

This area at the top of the stairs was annoying and time consuming. Among other things, I had to cut the existing floor joists to be even with each other and be the proper distance back to create an even tread depth. This also involved cutting into the existing floor. It’s one of those things where no one will ever know all of the small adjustments that had to be made just to have this simple corner look detailed and finished.

Adding a bookshelf to the landing is really a game-changer. It’s just the right size and will help turn the landing into a place to linger rather and a space to just pass through.[Edit from Amy: The landing is Lucy’s new favorite place to play.]


Throughout this whole process we have also been staining and finishing the treads so that they will be ready to go when we are done with the rest of the carpentry. Oh – and you can also see in the picture below the porch ceiling beadboard that we refinished and that is now awaiting installation.

I had to remove the 2×4 treads pretty early in the project, which has made going up and down the stairs a little more of a challenge. At first, walking up the stringers to get upstairs was kind of novel and fun, but now it’s just annoying for everyone.

In fact, our cat had a little mishap and ended up sliding down the drywall! She refused to go upstairs for a while after that, until we got the risers installed.

Up next, priming, painting, and putting everything together!
Stay safe, everyone. We hope you are finding ways to use this unexpected time quarantined in your homes.
")
")
")

Looks really great..hard to believe its been 5 years
LikeLike